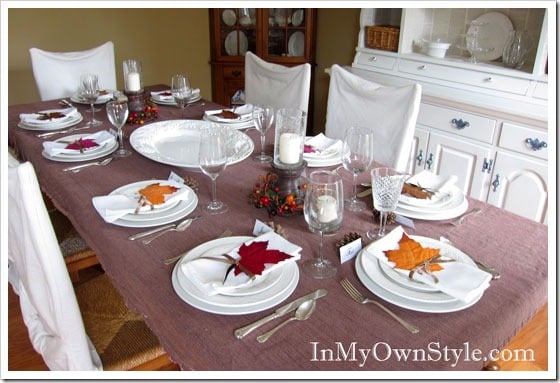
How To Enlarge A Dining Room Table for Extra Seating

A dining table can be a big part of your dining room or kitchen. If you find yourself hosting a dinner party where you want to extend the table to make extra room for guests. Here is one way to do it.

Every Thanksgiving my small dining room table that normally seats 6, gets extended to seat up to 14 with the help of a handy piece of plywood that my dad made many years ago exclusively for my table.
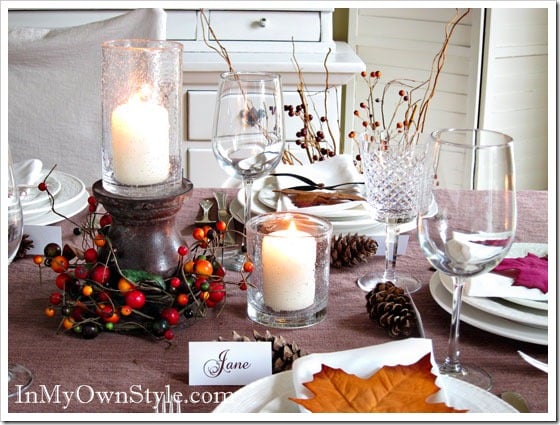
Thanksgiving-Tablesetting Ideas

Would you like to save this post?

Enter your email below and I’ll send it to you!

How to Enlarge a Dining Room Table for Extra Seating

Here is an overview of how the extension top for my dining table was made.

After the last photo in this overview I have also included a detailed section with a description of how the extension top gets attached to the dining table as well as answer a few questions about the wood top.
How to make a dining table larger
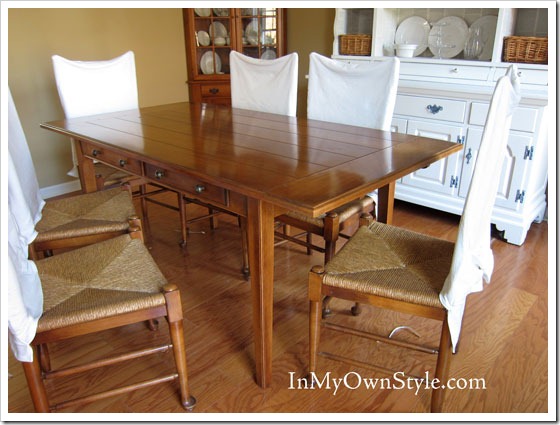
Dining table with 6 chairs

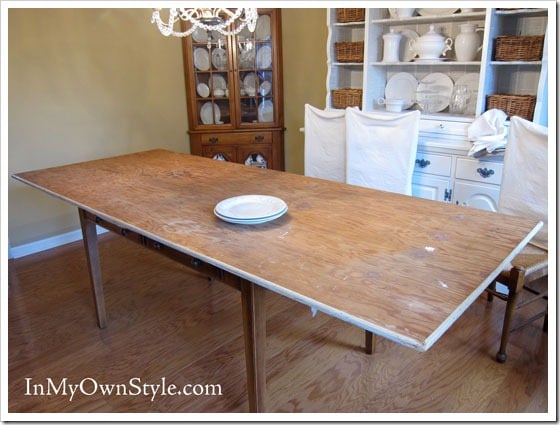
My dining room table and chairs were handed down to me from my parents. The table doesn’t have center leaves to extend it, so my dad made a plywood top that comes out every Thanksgiving and stays up until Christmas.
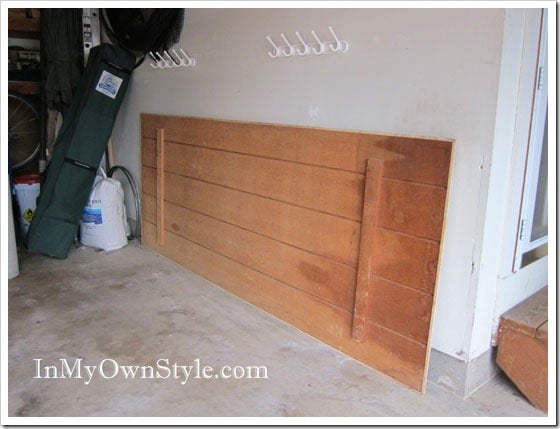
Table-Top-Extention

The table extension top shown in the image above gets stored against a wall in my garage.

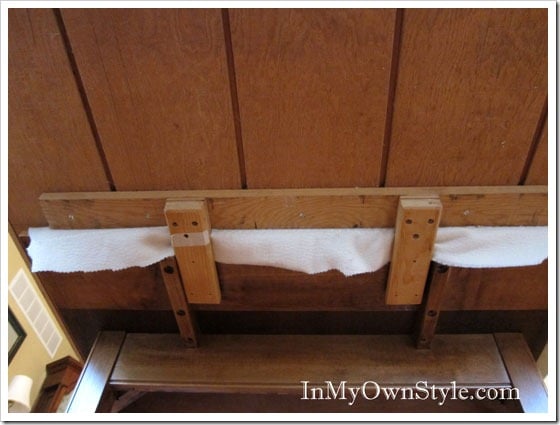
Take Note: See the vertical pieces of wood on the underside of the plywood table extension?  The space between them is the actual length of my dining room table.
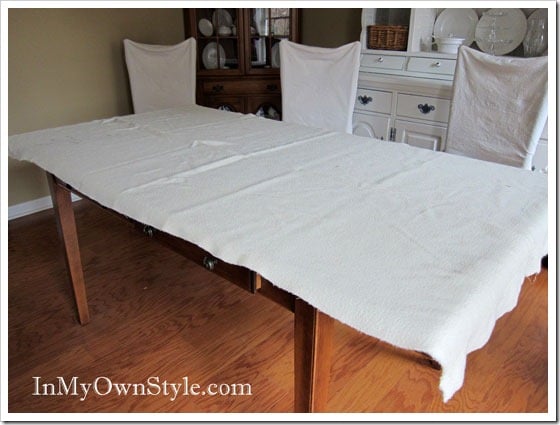
Table-Blanket for protection

When we have a need for a bigger table – for family birthdays, holidays and parties we get the extension top from the garage.

I first cover the dining table with a blanket to protect it from scratches.
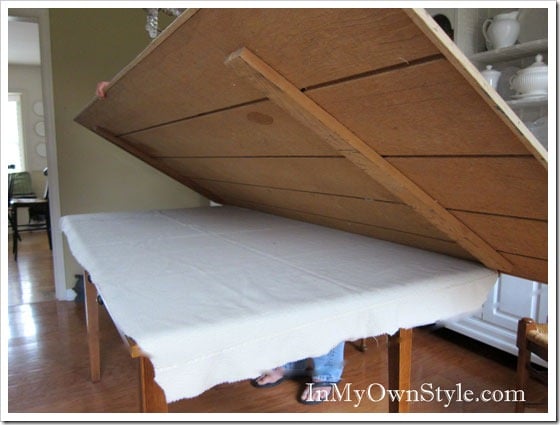
Putting-table-top-extention to enlarge a dining table

And the big extension top goes over the table.

The two vertical boards you can see on the underneath are spaced the exact length of the dining table so they fit snug right against the edge of the table.
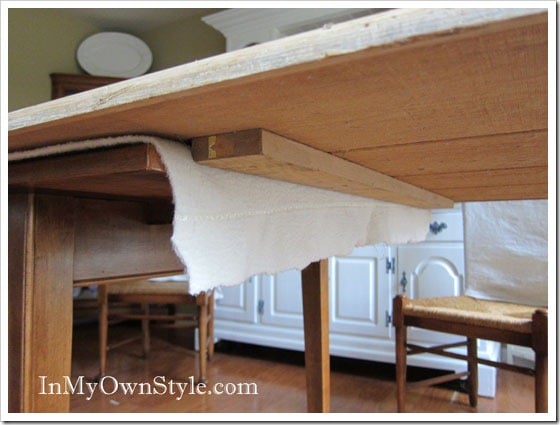
How to enlarge a dining table

What Does the Underside of the Table Look Like?

You can see how the vertical pieces of wood look underneath the table when the top is placed on. Each end of the table has one of these vertical pieces that is snug at this point, but the extension top could slide side to side on the table.

How To Secure Extension Top On Table
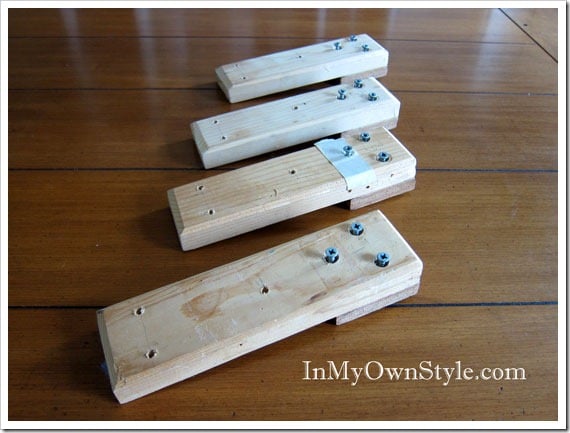
Table-Brackets used to make a dining table bigger

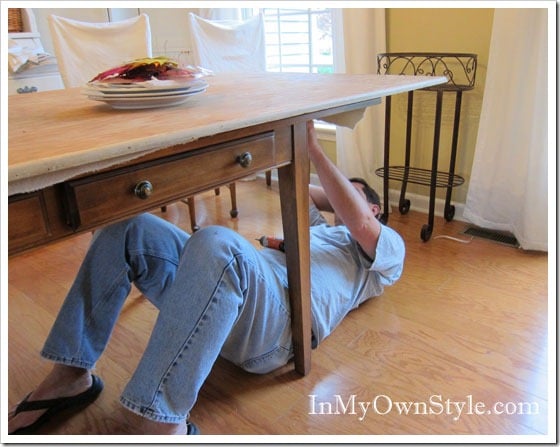
To secure the top and add extra stability my dad made 4 wood braces that are screwed on underneath the table, not to the table itself, but to the vertical strips of wood on the underside of the extension top.

Note that each brace has a block of wood under one end.  Ignore the screw holes on the left side of the braces, you will only need to use screws on the end with the blocks underneath.
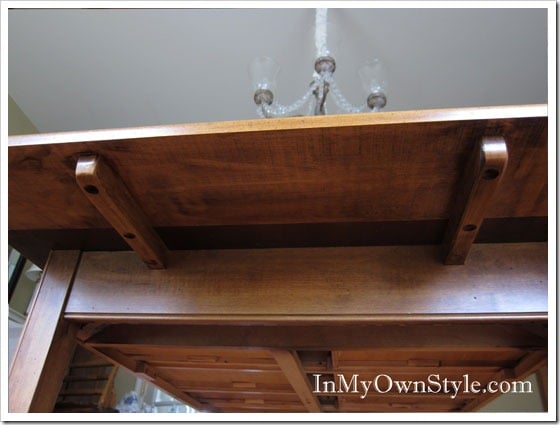
Under a dining table

This is how my table looks underneath before the plywood extension top is placed on. Your table may look a bit different.

TAble top extender to make

My husband putting the braces on.

Brackets-on-table to make a table larger

This is how it looks when the braces are screwed on to the underside of the top.

The wood braces screw into the plywood extension top vertical pieces – 2 on each side, not the table itself.

Profile View of Table and Top
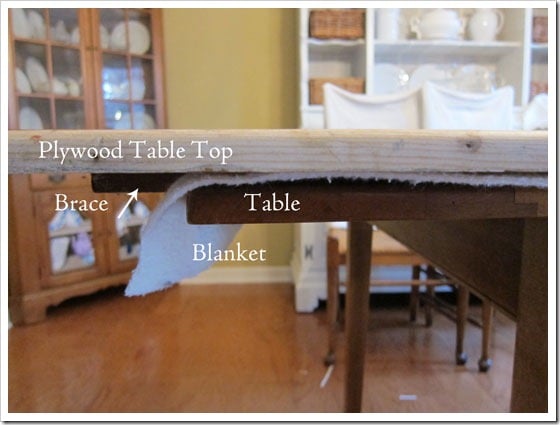
Side-view-of-table-top-exte

Here is a profile view of the top in place on the table.

Size of the Extended Table

The actual size of my dining table is: 36″ x 67″.  The size of the extension top is:  40″ x 98″

Now my 5’ – 8” table is:  8’ – 1” long and 4” wider.

It could have been made larger, but I wanted to still have ample room to walk around it in my dining room.

Table Top Extneder to seat more people around a dining table

Details On How to Make a Wood Extension Top to Enlarge a Dining Room Table

Figure out how thick to make the vertical strips under the extension top and the wood braces:

You will have to determine how thick the vertical strips of wood on the underside of the extension top and your braces should be. This is determined by the thickness of your table. Measure the thickness of your table. 

Example: If the table is 2 inches thick, the strips of wood on the underside of the extension top will need to be less than 2 inches thick. 1 inch thick will work. Half the thickness will be good.

The Extension Top

The underside of the extension top has two strips of wood. The space between where these are attached to the underside of the extension top is the exact length of the table.

The size of the vertical wood strips on underside of extension top: The strips of wood should be a little shorter than the width of the table and need to be half the thickness of the table it itself.  Again, as stated above: If your table is 2 inches thick, the wood strips underneath the extension top should be 1 inch thick.

When the extension top is placed over the table, the inner edge of these strips of wood fit snuggly against the end/edges of the table. 1 inch of the bottom edge of the table will be exposed since the table is 2 inches thick. This uncovered edge area is where the block of the brace will fit in.

The extension top is pretty secure at this point, but may slide, side to side- table width wise, but not length wise as the strips of wood underneath the extension top stop it from moving lengthwise on the table.

The Wood Braces

If you look at the photo of the 4 braces in my post, you will see that on each one there is one end that has a block of wood glued on underneath.

You need to make sure that the height of the block of wood under the end of each brace is the same thickness as exposed section of what is visible on the edge of the table when the extension top is on. Following my example of a 2 inch thick table with 1 inch thick vertical strips under the extension top, you will see 1 inch of exposed edge on the end of the table.

The 1″ thick block end of the brace will fit right up to this with the flat end of the brace fitting right under the table.

How to Attach the Wood Braces

To secure the brace with screws, you only need to screw in the block end of the brace to the strip of wood on the table top.  2 braces to each side.

Enlarged Table Set & Ready
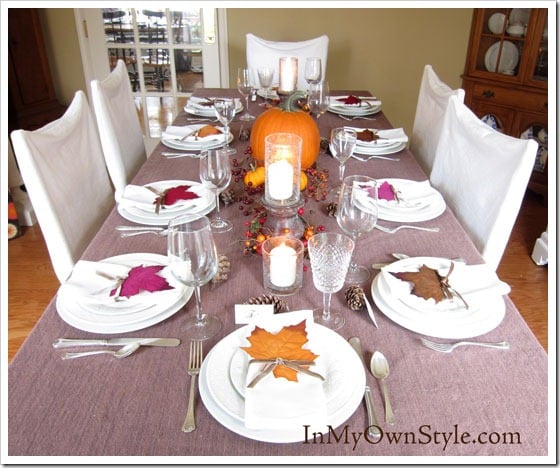
Thanksgiving-Tablesetting Ideas

I needed a place for 10 for Thanksgiving. But in previous years I have had 12 and even 14 people around the table.

Where to Find Extra Chairs If Needed

Since my dining room table only came with 6 dining chairs, I bring in stools I have along with my kitchen chairs.

You could also use benches and folding chairs.

Where To Get Large Tablecloths

thanksgiving-table

Adding the wood top to provide extra seating at the table, also means I need to have a large tablecloth. It can be hard to find tablecloths long and wide enough for the large extension top. I usually buy wide fabric yardage to make my own tablecloths.

On a few occasions I simply used the yardage and didn’t even add a finished edge.

You can also check out this Dining Tablecloth Alternative That Looks Like Wood. It is super easy to do and very inexpensive.
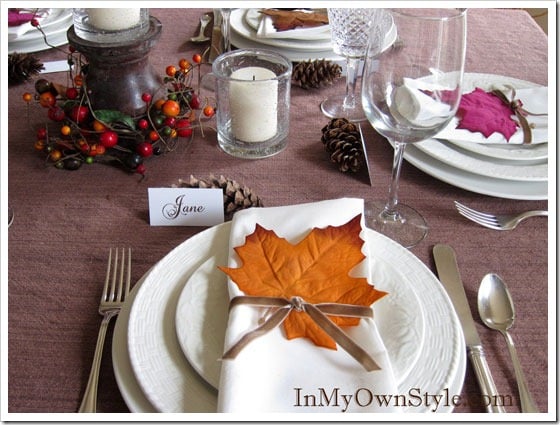
Thanksgiving-Table-Place-se

This brown cloth is fabric yardage I found on clearance at the fabric store. I didn’t even hem the raw edges.  
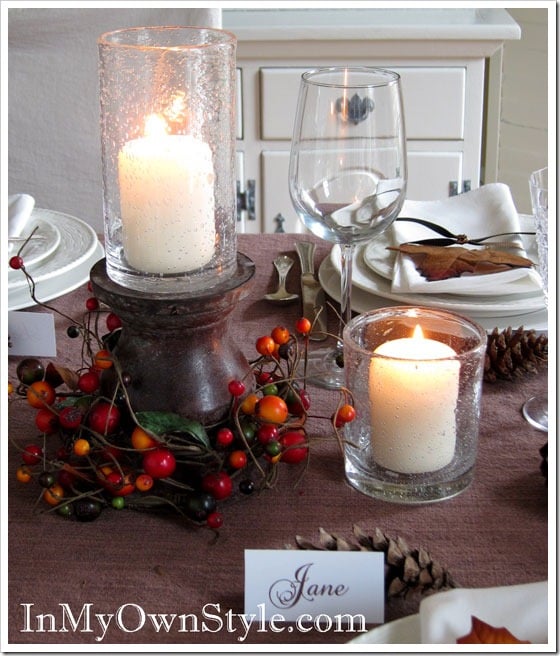
Thanksgiving-Tablesetting Ideas

DIY place cards: I made the place cards on my computer and used the font – Precious in 48pts.

Other Ideas to Enlarge a Dining Room Table
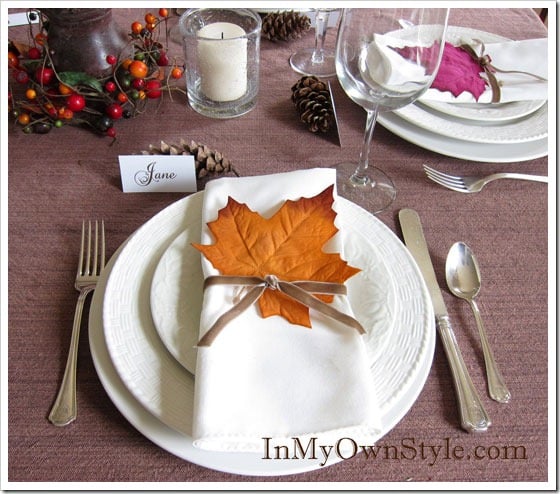
Thanksgiving-Tablesetting Ideas

How Do You Enlarge a Dining Room table That is Round?

You can certainly use a similar concept by cutting a piece of plywood to a larger table diameter than your current table.

But what if you have enough room, how about making a new top for the table? That was exactly the concept we used in our new home with our round table. The original table was fine for my hubby and me but when we have extra guests, things got very crowded. The new round wood table top is perfect.

How About Extending Oval Tables?

Extending an oval table can be a little tricky. It will really depend on the dimensions of your original table. But I think the simplest approach to create a new tabletop would be a mix of both solutions above.

First you can create a new round table top and then cut it exactly in half. Then follow the directions above to create the rectangular table top for the middle section.

I would strongly recommend joining all three sections together underneath for stability. You can then use padding to ensure the durability of your original table surface.
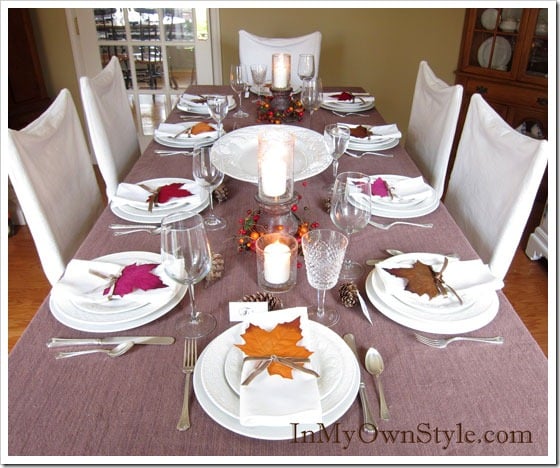
Thanksgiving-Table-with-Pla

With a little creativity, you can significantly extend your dining space without bringing in an extra table. The finished extension top doesn’t need to be perfect.

To see more entertaining ideas, table settings, tips, and tricks, head on over to my Table Settings gallery for all things Entertaining and Parties

How to make a wood top to make a dining table larger when you need a bigger table.

More Dining Room Decorating Ideas

Leave a Reply

Your email address will not be published. Required fields are marked *


87 Comments

  1. Genius! I’ve been wanting to extend my current table and have thought of so many other (unnecessarily complicated) ways of doing it (e.g., adding drop leaf or replace top altogether). I’ll also have to ask my dad to help me make this top! Thank you for this great idea.

    1. My dad also made a tabletop for me years ago! Kudos to our creative fathers!
      My goal was to be able to set up the new top by myself if necessary. If I remember correctly, Dad cut the plywood piece in half widthwise, thereby making the top in 2 pieces instead of just one. Underneath on each piece he attached a U-shaped frame made of wood pieces that measured to fit snugly over the blanket-covered real top. I could then sort of drop/slide each new end on. I seem to remember some kind of side bolting to secure them together (it was over 35 years ago).
      I really like your dad’s addition of the half-round edges! Makes it safer to handle and prevents wear and tear on your tablecloths, I would think, besides more attractive once covered.

  2. greg grande says:

    Do you know how to enlarge a round table? Or is there a name for a table top that will fit over an existing table?

    1. Diane Henkler says:

      Hi Greg – I don’t know how to enlarge a round table except for making a new round top for an existing table using 2 x 4’s or 2 x 6″s. I am in the process of doing this right now to make my round dining table in my kitchen to be 60 in diameter. Right now it is 46″. Have you googled ” how to make a round table top out of wood. A bunch of YouTube videos will be listed.

      Here is round table top extender that is pre-made: https://bit.ly/39s3lCJ

  3. That is ingenious, but instead of the screws couldn’t you just have an extra two batons underneath running perpendicular to the main two that stop it sliding lengthways? You’d have to lower the tabletop precisely, but it might be less nuissance than the screws?

    1. Diane Henkler says:

      Hi James – Yes your idea would work on some tables depending how the underside it constructed. It would make it easier to just turn a baton to secure the top. Thanks for sharing your tip.

  4. What a wonderful solution for family meals! Thanks for sharing this.

  5. This is EXACTLY what I’ve been looking for! We love our 4-seat table that works for us 95% of the year, but to have this option is awesome. Our handyman built it in less than 2 hrs and I’m already plotting new tablecloths. We made one very slight adjustment where the braces aren’t completely flush to the underside of the original table. We put plastic shims in between the brace and the bottom of the table to keep it really snug and ensure there’s no scratching. One question: I noticed you have tape or something on the edges. I assume that’s for splintering and that rough edge. Just curious what kind of tape you used? Thank you!!

    1. Diane Henkler says:

      Hi Susan –

      Around the edges of the table, it is not tape. There is half-round molding glued and nailed in with finishing screws. It is mitered at each corner. My dad added it to smooth the edges. Tape would work, though since the wood will be covered with a cloth. I would use a good quality of duct tape.

  6. Thank you for sharing this! Also, a huge thank you to your dad for solving a problem for those of us who love to host but don’t have the space!

  7. Lois Boston says:

    do you have written instructions for the braces and end pieces. And the size of wood use for the braces.

    Thank you

    1. Diane Henkler says:

      Hi Lois – I don’t have a post about how to make the end pieces and braces. My dad made them years before I wrote the post which is the reason I only have a finished photo of them.

      When I moved to South Carolina 4 years ago, the dining table didn’t fit in the house so I gave it to my older daughter so I can’t measure the braces for you right now. But with that said… the size you will need to make the braces will depend on how the underside of your table is constructed and it’s length. The size of the brackets for my table may not be the size your table will need. You will have to measure where you can place the braces under your table and figure out how long they will need to be so they can attach to the table and the plywood extension top.

      For the wood – any hardwood or good quality pine will be fine to use. At Lowes and Home Depot, they sell short sections of oak, polar, pine and birch so you don’t need to have big boards cut down.

      Let me know if you still have any questions. I will try to help you as much as I can.

  8. Shari Citron says:

    What type of plywood did u use and how thick?

    1. Diane Henkler says:

      Hi Shari – 1/2″ – 5/8″ works fine. If you use any thicker the table top gets too heavy. My dad made my table top and made 2 others for my sisters. He made each one using different plywood. For mine, he actually used plywood paneling. It is very rigid. For the others he used poplar, but that can get pretty pricey and there really is no need to spend that much. Just make sure the plywood is rigid.

  9. This is great idea to enlarge dining table

  10. Hamilton Billiards says:

    Excellent article, thanks for sharing.

    Dining room tables are an essential part for any home. They can act as such a strong centre-piece for any home, enabling strong interior design to follow.

    I have supplied many households with snooker dining tables, which provide conventional dining tables that can be converted into snooker tables with ease.

    I’ve always made sure the designs emit a traditional vibe.

    Keep up the great work!

  11. Sarah Taylor says:

    Thanks so much – this is just what I was looking for. We have a square table and I think this would work to extend it for family celebrations. Love the bracing idea. So simple but so effective.

  12. Thank you for posting such a wonderful idea. I was just about to sell my much loved table as it only seats 6. We need a table to occasionally to seat 10 but I really didn’t want to have such a large table when its only the two of us in the house.
    Now to convince hubby :)

  13. Just made one of these today! Thank so much for the idea of the braces underneath. My table went from fitting 6 tightly to 10 tightly ;) or 8 with tons of room to decorate for Christmas. Love it!

  14. Hello Diane
    Thank you so much for sharing this great idea. I was thinking on something similar, and thanks to you and your dad now I know how to do it. I will send you photos when I finished the project. Do you have photos of your Thanksgiving table? Thank you again.

    1. Diane Henkler says:

      Hi Maria – I do have quite a few posts that show how I have set my table for Thanksgiving. You can find the posts in my Table setting project gallery here: https://inmyownstyle.com/category/tablesettings

      Looking forward to seeing your table top. :-)

  15. Georgia Calonico says:

    Would this work with a 6 seating oblong table?

    1. Diane Henkler says:

      Hi Georgia – The plywood table top extender could work for an oval table, but you would need to attach the clamps on the long side of the table where the edge is the straightest. Mine are on the short ends. It would also depend on how the underside of your table is designed. It may not look exactly like mine, but as long as there is some place to attach the board to the underside of the table to secure it, it will work.

  16. mandy wood says:

    Brilliant , I have been looking for an old extension table to replace my modern one – this idea is so good, I will buy a small retro table and make another larger top for it to use at parties – so simple – I am an artist so I can make something amazing of the top using glass and inlay etc and give it a stone look finish …………love the idea – thank you so much!!! Will post it to my web page when done. mandywoodstainedglassandart.com

    1. It is a great idea. A bit of the problem is to carry it around as it must be heavy. There are some table pad companies making table top extenders in sections and they fold in half for easy storage. I purchase mine from Heartland Table Pads. They delivered fast and I like what I accomplished. My table seats 14 people now, 6 more than before. They were very nice to me and the price was very reasonable. My neighbor purchaser 72″ round extension from them for her glass table. It looks great. Anyway, there are probably some other solutions but this one is good as each section folds in half and I even purchased customized storage bag to put them in and store under the bed.

  17. You solved my problem with my table in my new house and I’m trying to do this. We were ok until guest came over then we had a baby and he has no seat!
    Question is the braces seem to be more than 2×4?
    Is there a piece on each end?
    Do you have the size and dimensions? Looks like it may be wider than a 2×4 to have three screws ?
    And do you screw the brace into the table . It looks like there are holes on both ends?

    Thanks this is amazing!

  18. DIck Grune says:

    Great Idea… I can use something like that at times but to a smaller size. One question or comment. Could not you use felt on the bottom of the covering top so that you would not have to find a blanket every time you want to use? Is moisture staying in a permanent mounted protective bottom?

    1. Diane Henkler says:

      Hi Dick – That is a great idea to add felt to the back. I have a blanket cut to size that I use only for the table. I keep it with my table cloths so it is pretty easy to use. I store my top in the garage – moisture is not a problem, but dirt, spiders, etc. Felt or fabric would get pretty dirty and hard to clean. If I could store it inside or a clean area, I would add felt to the back of mine. Thanks for taking the time to share your idea.

  19. This is EXACTLY what I was looking for! I had an idea this might work, but hadn’t seen it in use until visiting your site. I also have space constraints, but would like something to make the holidays easier; I’d done a kitchen pass through window in my house with a counte rtop I’d made, using a plywood cleat in the half wall. Like your Dad, I wondered if you could use an existing table as a cleat for a larger table top. WELL DONE AND THANKS!
    P.S. I was considering finishing the plywood with a stain and poly, using a router to put a nice edge on….think it would work?

    1. Diane Henkler says:

      Hi Dennis – A routered edge would work and look nice. So would stain and poly. If the plywood is nice, you may not even need a cloth.

  20. Wow, what a wonderful blog. My husband and I have been trying to figure out how to extend our dining room table to fit more people. We were looking for a low-cost solution that could easily be stored away when not in use. We had a similar idea but couldn’t quite work out how to prevent the top from sliding around and your article explains it all. I am sure that my husband will be thrilled to see this, as he had some very complicated ideas that only an engineer could come up with.

  21. Lynn Haskin says:

    I’ve been wanted to have something like this for our patio table. Thank you so much for bringing us a step closer to having my dream table!

  22. Alycia Nichols says:

    I wish I had a handy husband to make something like this for me! I tried to get me Dad to make one for me before his Alzheimer’s got too far out there, but it was too late. I’m currently on the hunt for a 60″ round extender piece which is what landed me here on your site. Wow…your top looks great, and it was extra smart to include the braces!

    Great post! I’m sure you are still enjoying this wonderful piece all these years after this post was written. It was definitely built to last!!!

  23. Corinne Austin says:

    Diane,
    Thanx so much for your detailed photos. I modified your plan by splitting the top in two pieces, but the connecting locks and braces keep it from tipping if someone leans on the end when they get up from the table. Looking forward to using it a Christmas. :-)

    1. Linda Irene says:

      Hi Corinne, I want to create something like what you describe, because my rooms are quite small and moving the new top in and out of place will be tight. What exactly are the “connecting locks and braces” that you refer to?
      Linda Irene

  24. Your table setting is so new england! Lovely, yet simple. How did you paint (?) the bubble glass candle stands? I want some of those.

    Maybe one day you will do a post on what to do with a dining table with its legs made shorter by cutting off 2 inches at the bottoms. Thanks to Peter Hunt, who made the point, as Connie does here, that the table seems high. I agree. What I forgot to remember is that Peter was in New England where old tables usually don’t have aprons.
    Instead of having sweetheart cut an inch off first, to see how it might work, I had him do 2″ all at once. (I need to re-read Peter’s book, to see if he really wrote 2 inches, or 1 inch!!!!) Now I have a 28″ high table with an apron. Which means that anyone with thick thighs is going to have a problem sitting at my table……..
    Do you have any idea what I can have sweetheart do now, or do I have to buy another table????…..DIY gone wrong……wrong….wrong…..
    But I’m going to buy that plain bare uncut door I saw at Habitat yesterday. For when I get the table legs thingy worked out……

    1. Corinne Austin says:

      MJ,,
      Depending the style of your table, you may be able to add ‘feet’ to your legs. Check at a furniture refinisher or upholster and bring a photo.

  25. Oh my goodness…it was so cool to see how you enlarge your table. We actually do something very similar…my sweet husband made a round table top out of plywood, it’s 82″ diameter and is large enough for 12 people. He made it in three sections so it’s easier to move and store, the 3 sections “lock” together with some hardware he found at lowes, and we put it directly on top of my regular rectangular dining table with a table protector underneath so it won’t scratch our table. I found a website where you can buy round tablecloths up to 144″ so that is what I did. I always love a round table for conversation, so this fits our needs perfectly. So cool to see your website with the same idea! LOVE your dining room and the brown/cream buffalo check!

    1. Hey Susan,
      What you husband did is exactly what I was wanting to do! I’m just not sure how to go about it. And what is the locking hardware from Loew’s?? It’s such a great idea….can you share any specifics???

  26. Great idea, thanks for sharing. Question on the braces…each brace has six drilled holes. Three of the holes (shown with screws in them) are to attach the braces to the new table top. How are the other holes used — do you also screw the braces into the underside of your table?

    1. Diane Henkler says:

      Hi Laura – My dad made the tabletop and braces. He made 6 holes at first, but realized when he was making it, you only need 3.

      The 3-screw section (thicker section) of the brace screws to the vertical piece on the underside of the extension top. These vertical pieces are spaced the exact length of the table. The other side of the brace (longer) runs under the the actual table – no holes or screws are needed. Every table is different and you will have to see what the underside of your table looks like. Mine has a side rail running under the table on each side. They act as side stabilizers. The vertical pieces on the underside of the ext top are spaced the length of the table – they fit snugly to stabilize the ends of the top. The braces make sure the top is secure and won’t tip.

      My dad made a top for both my sisters tables and the concept is the same for both of theirs, but the braces customized and designed differently for each table. I hope this helps.

  27. Genius! We just downsized and no longer have a dining room table. Thank you for the great photos, especially the underside securing cleats!

  28. This is so wonderful! We need to make one for our dining table. Do you know what thickness of wood he used, if he used plywood or mdf?
    With the lines on the underside of the wood, it almost looks like a piece of panelling…any specifics you can share for materials would be so very helpful! Thanks!

    1. Hi Taryn –

      The top is made of 1/2-inch plywood. It is a higher quality plywood-so it won’t warp. The molding around the edge is 1/2-inch small trim that has one flat side and a rounded top edge. You could use 1/2 round. This is nice to add as the tablecloth falls over the edge more gracefully – no hard edge.

  29. Thank you! We’re thinking of doing the same thing to expand the table we’re using for my daughters dollhouse. So nice to see how someone else has done it!

  30. We do the same thing when we have family/friends over for Birthdays and Holidays. Our regular table only seats 6 but with a full sheet of 4ft by 8ft plywood on top it can easily seat 12.

  31. Great idea — I think I’ll try it! Can you tell me the dimensions of the plywood board you use to seat 14?

    1. Hi Diana-

      It is 40″ wide x 98″ long. I am not sure why my dad used those measurements, but the nice thing is you can make it just about any size you need.

  32. Ruby Sugar says:

    This is an answer to a prayer. I host a small group Bible study in my home every Thursday- we have grown to 12 and outgrown my dining table. I have searched Craigs list for a large, inexpensive table to no avail. This is the perfect solution!! I think that I can do it – I will let you know. How blessed you are to still have your Dad. happy Thanksgiving!

  33. Paula Gale says:

    What a stunning table you’ve set. Your Dad was a very clever man for coming up with a brilliant solution to you table size solutions – and perfect if you don’t need a massive table all year round. I certainly could do with my husband taking instiration from your Dad’s idea.

    You have set it out lovely – your guests will be blown away – i wouldn’t mind an invitation to sit at your table that’s for sure.

    Paula x x x

    1. Thanks Paula-

      My dad will be coming to my house tomorrow. I plan on showing him this post and the comments. They will make his day. I have used the same tablecloth for years, but do try to change things up a bit each year. The pine cones are my new addition. Happy Thanksgiving

  34. Brook @ BeingBrook says:

    Such a clever idea!

  35. ScribblingSarah says:

    Your table looks so nice! & that’s a great idea of how to extended it (plus a fun memory/heritage).

    1. Hi Sarah-

      Thanks. I could not have Thanksgiving at my house every year without the table top. It has come in quite handy. Between T-day and Christmas it is not used and I use it as my gift wrapping station.

  36. That is absolutely fantastic idea!

  37. way nicer than anything I could do…I’m loving it!

  38. Connie@Connie Nikiforoff Designs says:

    What a cool idea! But I’m wondering about the added height to the table top….I know it’s not much, but there are some tables that already feel are too high for me….I’m short :-) I’m like you too…if I can’t find a big enough table cloth, or even a runner I like (which means one I think isn’t overpriced..haha!) I make my own. Sooo many more options that way!
    Love your table’s Thanksgiving scene! May you all have a Happy and Grateful Thanksgiving with family and friends.

    1. Hi Connie-
      The top only adds about an inch to the height of the table and doesn’t make a difference that you can feel. I have only found one cloth for the top – at Walmart of all places- and it is purple. I use it a Christmas. Hope you have a wonderful Thanksgiving with your family and friends.

  39. mary beth says:

    Simply brillilant! Thanks for the detailed instructions…my table is big enough with the leaves, but years ago I would have loved knowing how to do this! Happy Thanksgiving to you and yours!

    1. Hi Mary Beth-

      Thanks – Happy Thanksgiving

  40. Laura @ Laura's Crafty Life says:

    This is so clever! We don’t have space where our table is to do this, but in a future home I will definitely consider this. Thank you for sharing. :)

    1. Hi Laura-

      Having table leaves would be the best and easiest way to extend the table- but since this table didn’t have that option the top is the best solution. It does take up a lot of room and when I remove the top after Christmas the table looks so tiny and my dining room instantly bigger. :)

  41. Dianne, Thank you! You’ve helped me to solve a huge problem! We usually have to eat in two different rooms! Although we’re not having Thanksgiving here this year, this will help us for all the other meals we have here for our family! I LOVE your blog!

    1. Thanks Betsy – I know many a family that does the same thing or they butt two or more tables onto the dining table that extends into a foyer or hallway. No one ever seems to complain – it is all part of celebrating the day. I hope you and your family have a Happy Thanksgiving.

  42. Ready Home says:

    I just found out last week that I will be feeding Christmas dinner to 11-12 this year. I’ve been racking my brains since trying to figure out where to seat everyone, as my dining table only seats 8 with the extension (and that’s not exactly comfortably). Thanks for sharing this… I think you helped me solve my dilemma. :) Oh, and I just gotta say… I love how the leaves give a little pop of color on top of your place settings. Very nice!

    1. Thanks so much. I do love the dollar store and finding inexpensive decorations like the leaves. I hope you enjoy your full house tomorrow. Happy Thanksgiving

  43. Catherine says:

    That is such a clever idea. I only need to extend my table occasionally when family visit (maybe 2/3 times a year) and was looking at buying a new extension table but this idea is so simple even my hubby could do it :). Guess I know what he’ll be doing this weekend. I live in New Zealand so no Thanksgiving here. Thanks, Catherine

    1. Thanks Catherine-
      I only need the top a few times a year, – birthdays, Thanksgiving, and Christmas. I forgot to add in the post that between T-Day and Christmas when it is not being used I use it as my gift wrapping area. It is perfect.

  44. I can’t believe I have never thought of that before. What an amazing idea.
    Jamie
    http://diyhshp.blogspot.com/

    P.S. I have another giveaway going on right now. Would love you to stop by and check it out.

  45. Nana Diana says:

    Diane- I love how your Dad made that. How perfect AND it screws in place with braces…most people would never think to do that. How blessed you are to still have him as part of your life. I’m sure there are a lot of memories attached to that table/set!

    I hope your Thanksgiving week is wonderful so far! xo Diana

    1. Hi Diana –

      So funny you mentioned the screws and braces. :) My dad is a PERFECTIONIST!!! It used to drive my brother, sisters,and I crazy when we were growing up. Now we see it as a blessing. He never did anything half way. I hope you and your family have a very Happy Thanksgiving – give those Sweet Cheeks some extra kisses.

  46. WHen I was growing up we had a recreation room with a billards table and a ping pong table. My mother would do the blanket/plywood thing on the billiards table and she had huge cloths that she placed over both. We had huge crowds and she would seat everyone. Great memories. Hope you have a lovely Thanksgiving!

    1. Hi Lesley-
      I fondly remember one of my childhood friends family doing the same thing over their pool table. They had a huge family and it made perfect sense and a memorable tradition. Happy Thanksgiving

  47. My family has done something similar to our table, for as long as I can remember! Such a great idea! = ) Your table looks great & I really love the leaves on the napkins, great touch!

  48. Sheryll & Critters. says:

    Oh what a wonderful gift from your dad. So clever of him and so very thoughtful too. Your set table is just beautiful, I love it.

    I miss my dad.

    1. Thanks Sheryll-

      My dad is 84 now and still gets around, but he is getting frail. He will be at my house on Thanksgiving and every year he checks to see how the table top is holding up after so many years. My brother, sisters and I always kid him and say – if you built it dad – it will last forever!!! He always built things to last.

  49. melanzana says:

    Super post i super ideja!!!

  50. Maury @ Life on Mars says:

    That’s brilliant! Your father must be a very smart man!

    1. Thanks Maury-
      My dad was an engineer and he always was tinkering in his workshop coming up with stuff like the tabletop. He has made some pretty amazing things and has taught me quite a lot about DIY.

  51. Marty@A Stroll thru Life says:

    This is such an amazing idea and it works beautifully. Very clever. Happy Thanksgiving and enjoy all of your family. Hugs, Marty

    1. Thanks Marty-

      I hope you and your family have a wonderful Thanksgiving, too. xo

  52. What a great idea for a table “extension!” And I love the bubble glass candle holders. :)

    1. Thanks Cheri-

      I love bubble glass and think it looks perfect on my semi-rustic table setting. I look for it whenever I am out and recently found two more glasses at a local thrift store.

  53. THAT is a VERY neat idea!!!!! I LOVE IT! I always wanted a really huge table so when we built our house us and our carpenter built one out of 2 by wood. I bought ladder back chairs and my sis and I stained them all to match the table in a pecan stain. I loved the table but figured out after a few years it was just too large for the narrow room. IF I’d thought of something like this that would have worked wonderful! Anyway long story short, I couldn’t stand the thought of getting rid of the table so I kept it and now it’s in my sewing room and I dearly LOVE that I didn’t get rid of it because it’s PERFECT for in there! Back in Feb. we closed in our front porch and made me a sewing room and I love it in there because I have a nice place to work and it’s nice and thick so it will be there for forever! lol